In the digital age, managing your virtual presence is arguably just as important as your physical presence. Location spoofing is no longer exclusive to secret agents or voyeurs; any tech-savvy individual may do it for various legitimate purposes. Enhancing privacy, bypassing geographic restrictions, and enjoying unrestricted internet browsing are just a few examples.
In this guide, we’ll walk you through the process of changing your iPhone’s location and Apple store settings. Whether you’re seeking to hand-tweak your settings or just want a simple way to disguise your location and shield your online activities, we’ve got you covered!
So let’s get right to it!
Why would you need to change your location on iPhone?
First things first — why would anyone bother changing the location on their iPhone? Does it really matter and is it even worth considering when iPhones are more secure than most devices? While that’s true, no device is immune to the plethora of security threats nowadays. Furthermore, there are many other valid reasons for wanting to change the location of your iPhone.
For one, altering your location can give you the ability to circumvent location-based content restrictions, allowing you to access a broader range of media and services than would otherwise be available in your region. This includes accessing different versions of streaming services like Netflix or Hulu which, thanks to how copyright is negotiated on a country-by-country basis, offer different content libraries depending on location in the world.
By changing your location, you can prevent targeted advertising and avoid price discrimination while shopping online. Businesses often alter pricing based on customer location and willingness to pay, known as ‘geographic pricing.’ With the ability to spoof, or alter the digital appearance of your location, you can find the best deals regardless of your actual whereabouts.
Moreover, safeguarding your actual whereabouts enhances your privacy and security online. Trackers and websites that monitor your movements for targeted advertising become less effective when your true location is obscured. But whether for privacy, accessibility, or economic reasons, the benefits of changing your iPhone location are substantial and worth considering.
How to change location on your iPhone?
Now that we’ve established the usefulness of changing your location on iPhone, let’s discuss how to do it. There are a few different methods you can use, but by far the easiest and quickest is a VPN (Virtual Private Network).
A VPN is a service that creates a secure connection between your device and the internet. It routes your traffic through an encrypted tunnel, making it seem like you’re connecting from a different location.
So, for example, if you’re in Canada but want to access content only available in the US, you can connect to a VPN server located in the US and appear as though you’re accessing the internet there.
Change location on iPhone using a VPN
The good news is that it has become extremely easy to use VPNs on iPhones as most major providers have dedicated apps for iOS. For this section of the guide, we’ll be referencing the steps on how it can be done using ClearVPN — a powerful and user-friendly premium VPN service with 47+ server locations around the world.
Note that this process may differ from other VPN service providers, but any should generally follow the same concept. You will connect to a server location provided by the VPN service, and it ‘spoofs’ your actual location.
- Download and install the ClearVPN app on your iPhone device via the App Store.
- Tap on the “Explore App” button which takes you to the ClearVPN dashboard page.
- While you can start using ClearVPN for free via the “Smart connection” mode, you’ll need to create and account and sign up for a premium plan (starts at $5 per month) to unlock the “Location changer” mode (select specific server locations). You can do that by tapping on the “Try for free” button.
- Assuming that you’ve already created an account and signed up for at least a 3-day free trial, the next step is to swipe left to the “Location changer” mode and tap on the “Pick Country” button.
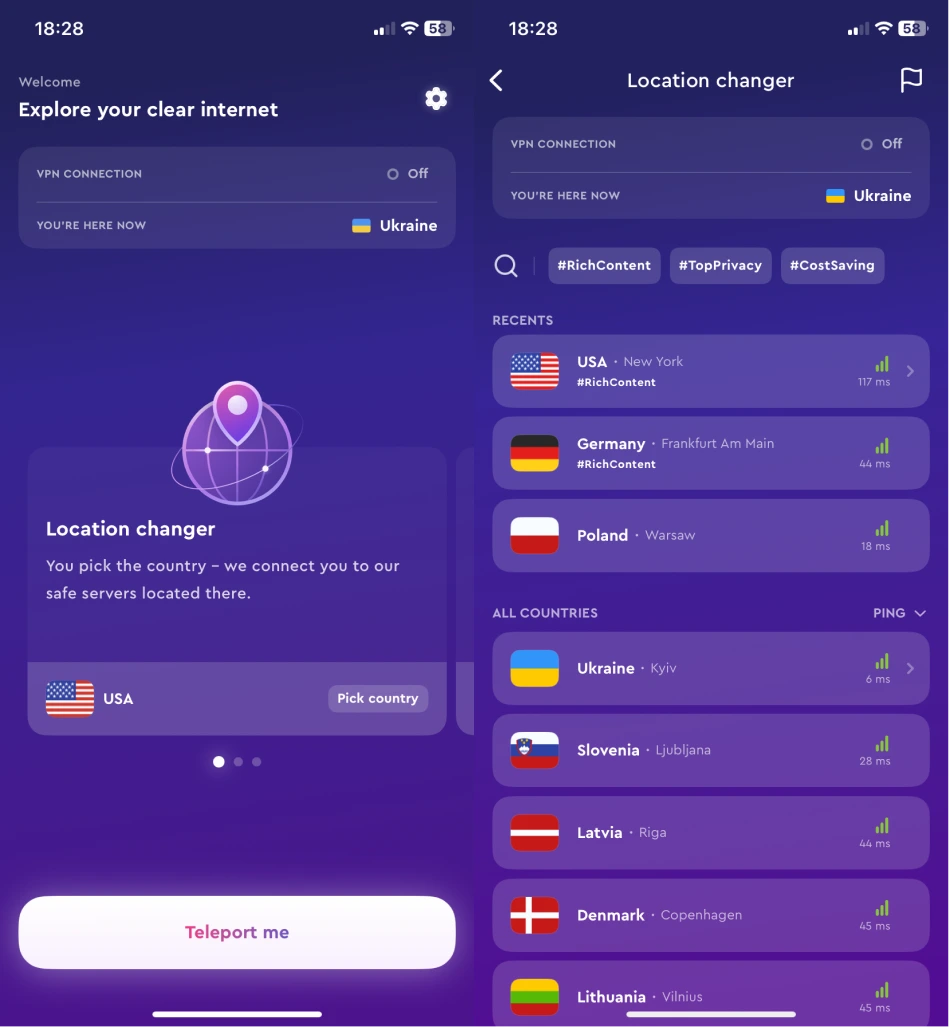
- Select a country/location that you wish to connect to. The app will then connect to the selected server location and a connection status bar will appear at the top of the app, indicating that you’re now connected.
And that’s it! Your iPhone’s location has now been changed, and you can access content and services specific to the selected location. You can also easily switch between different locations by following these same steps.
If your purpose is to access streaming services not available from your location, then remember to use the “Streaming” mode instead of the location changer. There you’ll find a list of streaming services that are optimized for specific server locations and can be accessed with just one tap.
Note that a VPN still has its limitations and can only spoof your location for internet-based activities. So it cannot be used to fake GPS location on iPhone (determined by your device’s hardware) or change your Apple store region (determined by your Apple ID).
How to change Apple Store region on iPhone?
But let’s say that your main goal is to change Apple store region, which is useful for a variety of reasons. It can allow you to access different localized apps, music, and other content specific to the selected region. So how do you go about doing it?
Well the process actually means creating a new Apple ID and deactivating your current one. This is because Apple uses your Apple ID to determine the country/region for your account.
Here are the steps:
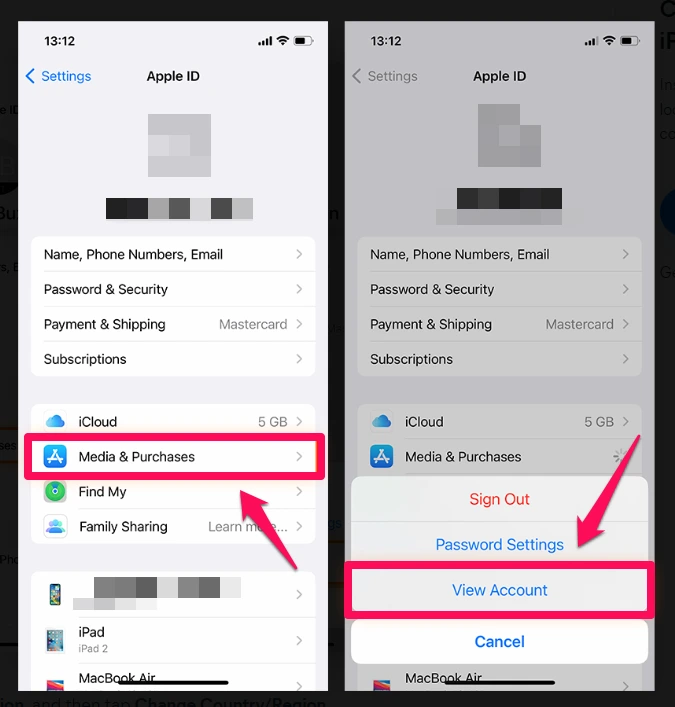
- Open the “Settings” menu on your iPhone and tap on your name at the top.
- Scroll down and select “Media & Purchases”, then tap on “View Account”. You may be prompted to enter your Apple ID password.
- Once in the account settings, look for “Country/Region” and then tap on “Change Country or Region.”
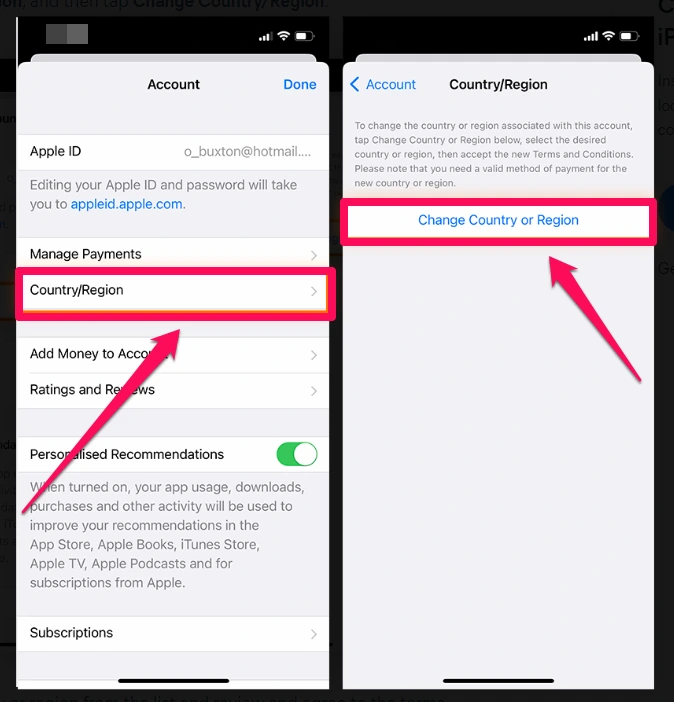
- A list of countries and regions will appear. Choose your new desired location from this list.
- Carefully read and agree to the terms and conditions presented to you.
- Finally, select a new payment method and provide the required billing information for your new region.
Before starting this process, it’s important to handle a few prerequisites. Make sure to:
- Spend any remaining Apple ID balance, as you won’t be able to carry it over to the new region.
- Cancel any active subscriptions, as they might not transfer to the new region.
- Consider backing up any important data, as you’ll need to re-download all of your apps, music, and movies after changing your region.
Changing your Apple Store region could lead to a significant change in the availability of content. It’s important to ensure that you tie up all loose ends to avoid any unnecessary hassles. You will not be able to revert back to your original region for 90 days after the change.
How to change your iPhone location without VPN?
Suppose you want to change location on your iPhone without using a VPN. What are your options? Well, the only way to do that is by using a location spoofing app. These apps take advantage of the iPhone’s built-in GPS and allow you to manually set your device’s location.
Now the tricky part is that the App Store doesn’t actually allow location spoofing apps. You’ll have to jailbreak your device and use a third-party app store like Cydia to install these apps. This is something that we don’t recommend since jailbreaking your device can lead to security vulnerabilities and void your warranty, not to mention the technical complexity of it all.
For these reasons, we recommend sticking with a VPN for changing your location on an iPhone. Not only is it safer and easier, but it also allows you to change your location while maintaining the security of your device and data.
FAQs
How to download an app that is not available in your country iPhone?
To download an app that is not available in your country on an iPhone, you will need to change your Apple Store region. This can be done by creating a new Apple ID for the desired region.
Remember to cancel any active subscriptions and spend any remaining Apple ID balance before you change your region since these won’t transfer to your new account.
How do I bypass Apple Store region?
You cannot bypass the Apple Store region restrictions since it’s locked in with your Apple ID registration. However, you can change your Apple Store region by creating a new Apple ID for the desired region. Remember to back up any important data and cancel active subscriptions before changing regions. 90 days must elapse before you can revert back to your original region.
How do I change my GPS location?
To change your GPS location on an iPhone without using a VPN, you would typically need to use a location spoofing app which often requires jailbreaking your device, a step that is not recommended due to security and warranty concerns. Also, keep in mind that manipulating GPS location without legitimate reasons can breach terms of service of many apps and potentially lead to account issues.